Designing An Adhered Masonry Veneer
Words: Steven Fechino
Words: Steven Fechino, Engineering and Construction Manager, Mortar Net Solutions
Photos: Mortar Net Solutions, Keene
Sponsored by Mortar Net Solutions
Walls today offer better technology and water protection than in years past. Adhered masonry veneers are better designed and perform more efficiently when the entire wall system is considered before and during installations. Here is a simple primer that includes materials we work with on a daily basis.
Many of the design changes in recent times are a result of economic changes in materials, improvements based on testing, higher performance by design, and installation improvements. We will look at some of the more prevalent products commonly found in adhered masonry sections and how they individually can affect your thin veneer walls.
Adhered Masonry Veneers
Today’s adhered masonry veneers offer a wider range of aesthetics than in previous years. Pre-made, slip and fit patterns, more color choices, and overall quality of the products have increased, bringing big improvements from years past. Increased durability and overall performance of an adhered masonry veneer can be achieved when the design begins with the substrate and works to the face of the veneer.
We will look at the differences between a cavity wall and an adhered masonry veneer. Our discussion will cover basic materials used in residential and light commercial construction of a stud constructed structural substrate.
Parts and Pieces of the Adhered Veneer Wall
Available thin veneers can be thin natural stone, thin brick, thin cultured stone, or synthetic veneer systems. Thin veneers can range from 3 to 25 pounds per square foot (PSF) when applied to the wall, a wide range that must be considered when sizing the dimensional framing members. I mention this because I once had a job where the designer changed the veneer and framing had to be increased to handle the eccentric load of the veneer.
This was a big change order that could have been avoided for the owner of the designer would have held to original material choices. The weight of the veneer can usually be obtained from the material supplier so the design professional can properly size structural wall components early on in the design process. When the designer requires an adhered veneer and rigid insulation, this can be accomplished when section details are considered at the early stages of the project and should be an easy part of the wall design.
Unlike a cavity wall masonry veneer, where loading is placed on a brick shelf or a supporting lintel, the adhered masonry veneers are supported by attachment between the lath system and the structural substrate and the bond to the thin veneer material to either the concrete masonry back up or the attached lath. Adhered masonry veneers do not place the load on a foundation or weep screed.
Starting At The Structural Substrate Wall And Working Outward
The system begins with the selected metal wire lath fully attached to the substrate using anchors to support the lath system to the structural support studs of the wall assembly. To properly design the system, the designer must know the weight of the thin veneer. As mentioned earlier, the veneer creates an eccentric load based on three to five inches extending from the substrate exterior face of the wall, in pounds per square foot. The components of the eccentric load are the sheathing, weather-resistant barrier, insulation, metal lath, insulation, and the adhered material based on a metal or wood stud wall construction.
Proper screw anchor or fastening pin diameter and length together with the use of galvanized lath washers and plastic insulation washers will all be keys to successfully holding the veneer in place. Screw anchor sizing can be obtained from engineered charts distributed by many of the anchor suppliers. This will allow you to purchase pre-engineered anchors off the shelf for insulation thicknesses over ½ inch.
Comparing the Function of a Cavity Wall Veneer to an Adhered Masonry Veneer
Cavity wall construction in residential construction has made many big advances in the last 40 years, but it has also held tight to a few strong traditions that need to be evaluated.
Masonry veneer cavity wall sections in a majority of the country’s residential and light commercial structures included, from the inside out sheetrock, polyethylene plastic, and fiberglass batt insulation placed in between studs. One of several choices of sheathing, bituminous board sheathing, plywood, gypsum board, or more recently Oriented Strand Board (OSB).
A thin layer of rigid insulation, an air space; and a brick veneer. The wall section described functioned well in most geographical locations within North America in part due to the air space or cavity between the veneer and the structural wall.
The air space in a masonry cavity wall serves many functions, the most important of which is that it allows air, water, and water vapor to collect within the cavity, creating an opportunity for air movement, evaporation, and the passage of water to the exterior of the veneer through weeps placed at flashing levels and vents placed at the soffits. Other functional benefits of the cavity include restricting the ability of moisture to pass from the veneer to the substrate by direct contact.
Adhered masonry veneer wall designs can benefit from the lessons learned from cavity wall designs by adding a drainage plane to the sectional detail of adhered masonry veneers. The drainage plane is not typically as large as in a masonry veneer cavity, but it still allows drainage and air movement between the substrate and the exterior wall veneer system while maintaining properly anchored cladding.
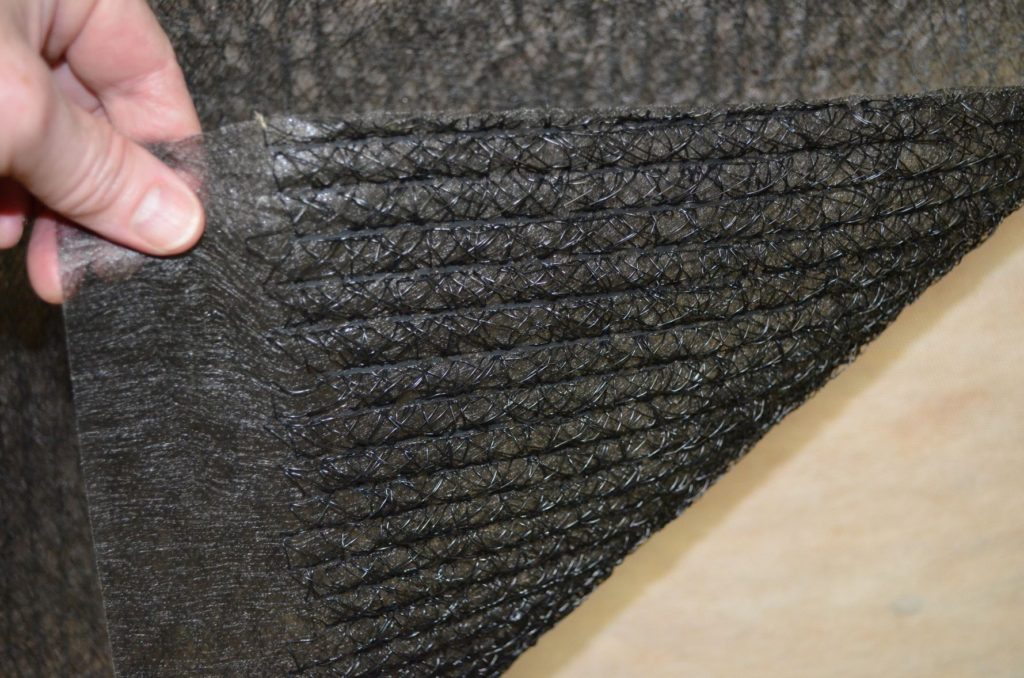
The air space is created by using a structural strand, entangled strand, or high-loft non-woven fabric typically made of polyester or polypropylene. The function of the drainage plane does not interfere with the installation of the adhered veneer because it is typically between ¼ inch in the United States of America to a 10-millimeter standard in Canada.
Drainage Planes
Building science and code officials have determined that the design of a drainage plane in an adhered masonry wall has many positive effects on the performance of the veneer over the life of the building. Drainage planes are typically either constructed from a polymer-based mesh material made in several different configurations and attached to the building using the veneer anchoring, or they can be constructed using furring strips attached directly to the stud support system of the substrate.
The use of polymer-based three-dimensional mesh allows the contractor and designer to eliminate one layer of weather-resistant barrier (WRB). This step can allow monies saved to be used for the drainage plane labor and installation. The polymer-based three-dimensional drainage mats allow liquid water to drain to the weep screed, and air to move between the WRB on the substrate and the interior face of the mortar scratch coat to promote rapid and complete drying of mortar in the adhered veneer system. This rapid drainage and drying of the veneer are key to creating a healthy, long-lasting performance in all types of adhered veneers.
LathNet, by Mortar Net Solutions, is a new product on the market that has been successful as a labor-saving alternative to the usual way we install the second layer of weather-resistant barrier and an extruded metal lath occur in two individual steps.
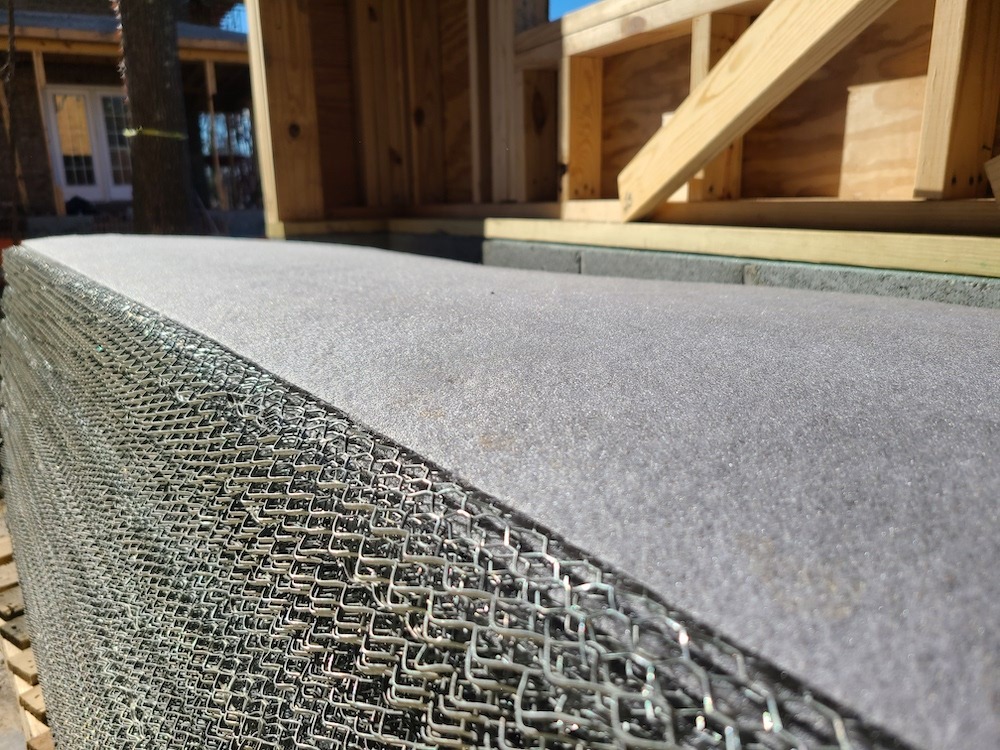
LathNet combines the two products into one easy-to-install product that overlaps and shingles as it is applied up the wall with code-approved overlaps to ensure proper installation. LathNet can also be successfully installed over rigid insulation with taped joints to offer a code-compliant system.
Wire Lath
Lath is offered in three different weights, 1.75 pounds per square yard for interior applications (this is a product that you should just stay away from), 2.5 lath is for typical applications and 3.4 pounds per square yard is for applications where the stud spacing is greater than 18 inches and the weight per square foot is over 13 pounds per square foot. 2.5 and 3.4 laths are for exterior applications.
Lath is typically placed horizontally, and the vertical laps of the lath are staggered from one layer to the next. Proper placement of the metal lath is stated in the trade as “cups up, smooth down,” meaning when you slide your hand up the lath from the bottom the lath will feel rough, and when you run your hand down from the top of the lath it will be much smoother to the hand.
Fiberglass laths do not necessarily fit into the previous description for placement. Self-furring lath includes dimples that hold the lath roughly ¼ inch out from the substrate to allow for full mortar encapsulation of the base coat. Typical metal lath for use in exterior applications is rated as “G-60 galvanized”, which will hold up under North American climate conditions. Stainless steel extruded metal lath is available for natatoriums and coastal applications.
Installation of metal lath is important and taking the steps to ensure a tight-fitting metal lath installation is well worth the effort. It is very important that the first course of wire is installed level and attached properly. Install the weep screed before installing the WRB and metal lath so they can lap over the weep screed nailing strip.
When installing lath against framing, mark stud locations to ensure anchoring of the lath is attached to a structural member. This will speed the installation process as you will be able to place your fasteners (screw and washers, nails, or staples) every six inches vertically and at every horizontal stud more efficiently and accurately.
If your layout is not square, correct it as much as possible in your initial product placement of the first course or two. Lath can be terminated at an inside corner. However, it must extend 12 inches in both directions on an outside corner. Cutting metal lath is typically performed with tin snips, sheet metal shears, or a 4 ½ inch grinder with a 1/8-inch carborundum blade.
Drainage behind thin veneers makes sense. If you have any questions just give me a call and we can determine if your next project will benefit from the additional layer of protection.