This month I want to discuss common flashing issues that I often get calls on to discuss. I detailed these as simply as possible. The ideas here have been used and proven over the years by many experts in the field.
Step Down The Arch Flashing:
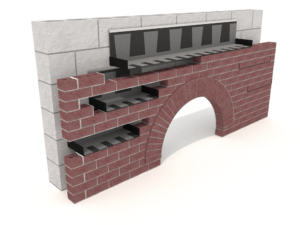
Arches can range in size; they can be tall, and they can be wide or a combination of both. Flashing an arch can typically be performed using straight pieces of flashing that begin at the lower corners of the arch and extend to a top piece that spans the center. The reason for this is that you should never have more than about three courses of brick in the wall veneer where the spans do not overlap. Placing the flat flashings is far more efficient in labor hours than fabricating a rolled flashing that would need to be installed after the first course is placed in the arch template.
Flashing:
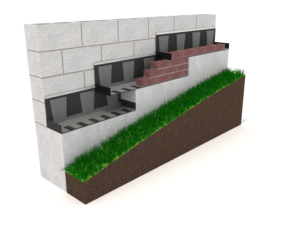
Step-down flashings are easy and efficient if planned accordingly. The first tip, build from the lowest elevation to the upper elevation; otherwise, you will rack your brain in layout. You simply lay the brick at the lowest elevation into the step-up. We recommend using a simple end dam in this location to keep water from going back into the foundation or basement of the building. Install the next course of brick above, again, directly into the step up, but you do not need the end dam this time.
Once you are at the next level, you will need to install the next course of flashing, extending approximately 18 inches over the edge of the flashing below, using an end dam to complete your installation. You are now ready to lay brick on the subsequent courses required to meet the next step up. There is no need to waterproof the vertical section of the step-up. You can if it makes you comfortable, however, the overlap will collect the cavity water and pass it through the weeps before it can do any damage.
Counter flash Drip Edge:
The counter flash Drip edge is found typically on the roof side of the masonry that constructs the mechanical rooms, upper floor structures, and parapets. The counter flash’s purpose is to conceal the roofing’s termination bar and offer aesthetics and performance to the roofing. Typically, the counter flash is placed one to three courses below the through-wall flashing on copings and three to five courses above the roofing, where additional walls extend up from the roofline.
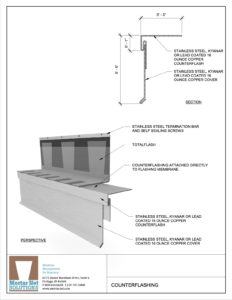
This can be simplified if the through-wall flashing simply has the counter flashing built into it. As a more considerable advantage still, the mason does not need to coordinate with the roofer or sheet metal fabricator to deliver the specific counter flashing on time as it is purchased with and installed to the TotalFlash.