Right the First Time: Proper Stone Veneer Installation
Words: Jeff Tew
Words and Photos: Jeff Tew, Director of Technical + Training, Westlake Royal Stone Solutions
Sponsored By

When preparing to install manufactured stone veneer, or MSV, on any jobsite, the most important consideration is to thoroughly familiarize yourself with information on ASTM-C1670 and the official NCMA-MSV Installation Guide, which is available at NCMA.org and includes instruction, best practices and building code requirements. Once you’ve given yourself the key foundational knowledge to get started, here’s a quick, step-by-step guide for MSV installation.
The prevailing goal is to get things right the first time, every time.
Wall Prep
In addition to completing a thorough wall review before you begin installation, here are a few top considerations for getting started with a new MSV project:
- Mock Panels: Building a mock panel provides everyone the opportunity to evaluate stone spacing and color distribution, along with mortar color and joint type, and it is an important step for avoiding potential disagreements during construction or after completion.
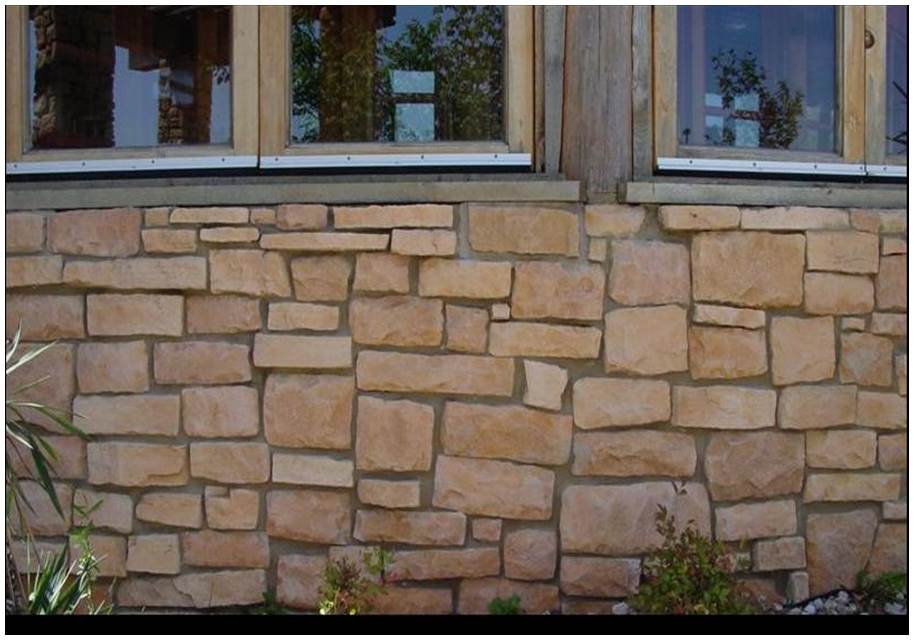 An agreed upon mock panel will help to prevent unsightly installations such as the one shown here.
- Flashing + Water Management: Include flashing at all terminations, transitions and penetrations, and don’t be surprised if you need to inspect the work done by someone else on the build team to ensure proper flashing has been executed.
- Scratch Coat: This is the base for your stone veneer installation and the method used to transfer the cladding weight to the structural substrate. Apply a ½” scratch coat to the lath so that the lath is fully embedded to minimize corrosion and give the stone a firm base to bond to.
- Technical Tip: Once the mortar begins to set, use a scarifier or notched trowel to create horizontal lines in the scratch coat, then give the scratch coat time to fully cure. A fully cured scratch coat provides better opportunity for mechanical bond in addition to chemical bond.
 Apply your scratch coat using good lines and maintaining clearance to the paved area.
Achieving Bond
Common causes for bond failure include improper mortar selection and improper mixing. Some less expensive mortars are in high sand or other materials that decrease performance. Once you’ve selected the right mortar, here’s what comes next:
- Mixing: Follow the mortar manufacturer’s instructions for water amounts, mix time, slake time, consistency guidance and other tips. These recommendations may vary based on conventional mortar versus modified mortar.
- HIGH-IMPACT RECOMMENDATION: Hydration of Scratch Coat + Stone: Don’t sacrifice a good bond because you didn’t account for a thirsty scratch coat or stone. When using Type S or Type N mortar, use a garden sprayer, misting sprayer or garden hose to wet both the scratch coat and stones prior to installing. Both stone and scratch coat should be fully hydrated but free of standing surface water at the time of installation.
- Polymer Modified /Modified Mortar: Be sure to contact the modified mortar manufacturer for recommendations on scratch coat and stone hydration.
- Dirt, Debris + Dust:Anything left on the back of the stone or scratch coat may cause bond issues, including dirt that has been splashed up during a rainy day. Be sure to clean the scratch coat with a brush and water multiple times a day to reduce risk.
- Technical Tip: Time your installation to fall after interior drywall and roofing materials have been installed, if possible. The vibration and weight of those installations may cause lumber compressions or structural movement, which can compromise bonds and lead to more risk of cracking.
- HIGH-IMPACT RECOMMENDATION: Setting Bed Technique: MSV relies on 100% mortar coverage and bond between the units and scratch coat, so don’t use methods like the “perimeter,” “donut” or “spot” techniques. Rather, firmly apply a thin layer of mortar to fill stone voids, then apply a heavier back butter setting bed mortar. While that ½” to ¾” setting bed mortar is wet, press and work the unit onto the prepared backing with enough pressure to force the mortar to squeeze out around the entire perimeter of the unit.
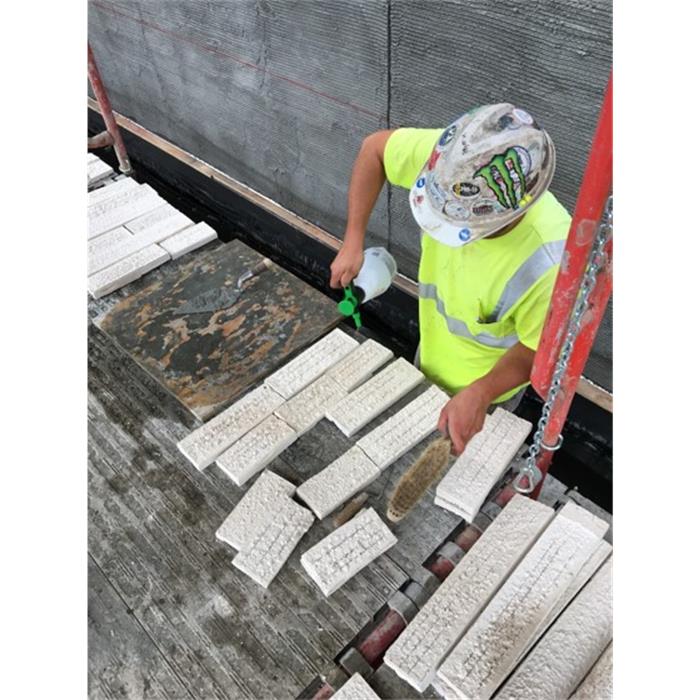
A best practice for achieving bond is to hydrate both your cured scratch coat and the bondable surface on the back of the stone veneer.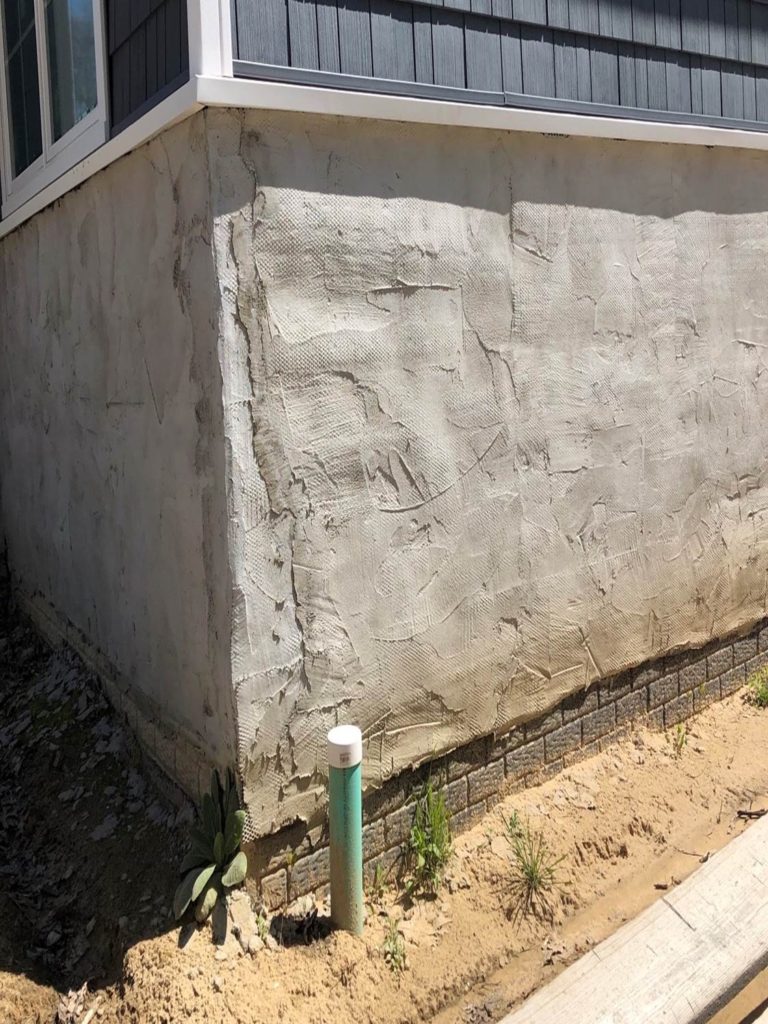
In addition to poor scratch coat application and a missing weep screed, this install is suffering from dirt and debris that needs to be cleaned up.
Setting Stones for Desired Joint Style
When setting the stones, you should maintain consistent joint spacing to achieve your selected joint style. Because you covered the entire back of each unit with ½" to ¾" of mortar and firmly pressed it to the scratch coat, you will have excess squeeze out. Before the excess setting mortar has time to harden, go back through with a jointing tool and compact the excess mortar far enough back so that it doesn’t interfere with your grout joint.
Take special care not to disturb the bond of the stone. A broken bond at this point will require the stone to be reset.
Creating a Realistic Appearance
One of the most important considerations when working with MSV is to ensure that the final installation looks as authentic as possible. Here are a few elements to keep in mind as you work on the wall:
- Cutting & Covering Cuts: With most manufactured stone textures, a saw cut really sticks out. Start by selecting a thinner stone for the cut, apply mortar to the cut edge to conceal the aggregate, and place it on the wall next to a thicker stone.
- Technical Tip: Use nippers or a brick hammer to provide a more natural cut edge and make the cut less noticeable. When possible, point the cut and covered edges away from walkways, porches, etc.
- Blending Material: Always work from multiple boxes. For flats and corners, lay out enough material (approx. 40 sq. ft.) to represent all colors, textures, and sizes, and be sure to check your material against a mock-up sample board or mortar board. Choose stones from your laid-out material to achieve an even mix of sizes, colors and degree of texture.
- Avoid Joint Alignment on Corner Installations: When possible, alternate between long and short legs as you work up the corner. You can create more corner sizes by cutting pre-made long or short legs, which provides more options to blend into the corner and avoids the risk of a “zipper” appearance.
Grouting + Finishing Joints
There are many grout options—standard joint, full joint, overgrout joint or tight-fit/drystack joint—available when applying MSV, and your grout selection will have a big impact on the overall look of each and every project. Regardless of which technique you choose, make sure the stone units are sufficiently cured before you begin grouting so you don’t disturb the bond when bagging or tooling.
General Grouting Tips:
- Only grout as much as you can manage at one time.
- Selection of joint tool and timing of tooling will affect surface appearance of joint. Joints can be tooled with a stick, striker, jointer or other blunt masonry instruments.
- Overgrout joints can be tooled (somewhat) earlier than raked joints.
- Tooling joints should be done once mortar has become thumbprint hard. Don’t allow joints to fully harden. Mortar should be pliable and crumbly; not too wet and not too dry.
- Using a grout bag is much easier than hand “tucking” joints.
- A plastic grout bag can work into tight gaps between stones easier than a canvas bag.
- Caution: Modified mortars are not recommended for joints. Modified mortar manufacturers typically offer a separate mortar for grouting.
Assuming that all goes well throughout the installation process, all that’s left at this point is to clean the project site as thoroughly as possible.
Additional Resources
To view brief, in-depth technical videos with more installation best practices, as well as to download the official NCMA-MSV Installation Guide and the Westlake Royal Stone Solutions supplemental guide, visit https://elevatewithstone.com/technical/.
In the event of any conflict or inconsistency between the tips, recommendations and installation techniques set forth in this article with the NCMA-MSV Installation Guide and any local code requirements, the NCMA-MSV Installation Guide and local code shall prevail. The tips and recommendations provided here are meant to improve the aesthetics and efficiency of the installation and do not replace required practices as defined in the NCMA-MSV Installation Guide. This article does not, is not intended to, and shall not be construed to create or establish any additional product warranties including, but not limited to, any with respect to Westlake Royal Stone Solutions products referenced herein.